This page helps you start integrating with CXone. It explains the tasks you must perform to start building an integration. To get started and make CXone API calls, you have the following tasks:
You can also use these pages to help you get started integrating with CXone:
Clearly define the purpose of your integration. This helps you understand the actions that your integration (or users of your integration) will perform. It also gives you an idea of which CXone APIs you’ll use.
For more information about application types, see the authentication overview.
NICE considers your integration either a back-end app or client-side app.
You should also determine if your integration will be for a single CXone tenant or multiple CXone tenants. Use the examples in the following drop-down to better understand the tenancy of your use-case.
Your application may need to authenticate users from multiple tenants or customers. You must determine this when registering your app with NICE. For example, if your application is productized and intended to deploy to distinct customers, you should choose Multiple Tenants so that your single registration will work across any tenant within the selected environments. Alternatively, your application may be developed to provide capability for a specific tenant and Single Tenant is appropriate.
An app developer wants to create an agent client. The client will integrate their platform with CXone. The agents must log in to use the client, so the developer needs to set up OpenID Connect. The developer plans to sell it to multiple customers, therefore, the developer selects Multiple Tenants when registering the app with NICE.
A business using CXone wants to create a custom reporting app for their internal employees. This will compile data from multiple sources, including CXone. NICE considers this a back-end application, since it entails server-to-server communication with CXone. This means they must set up standard OAuth2.0 authentication. The app will be built specifically for the business to use internally, therefore, they only need it for their single tenant.
An enterprise organization has CXone tenants around the world. They want to integrate a custom Bring Your Own Channel (BYOC) channel that will be available to all their CXone tenants. The channel does not require a user login flow, therefore, it is a back-end application and they must set up standard OAuth2.0. They want it available to all of their CXone tenants, so they select Multiple Tenants in their registration form.
An app developer wants to integrate CXone media recordings into their 3rd party platform. They plan to sell the app to businesses using CXone, therefore, they select Multiple Tenants in their registration form. The app will ingest data from each customer and display it on a personalized dashboard. To do so, the app communicates with the back-end of CXone and does not require a user login flow, therefore they must set up standard OAuth2.0 authentication.
Check out the CXone APIs documented on the developer portal. Depending on your preferred workflow, you can create a map or list of the specific endpoints you plan to use. You can also make test API calls to your CXone system from the documentation.
When your plan is ready, you must submit an Application Registration form to NICE. This provides NICE with details about your integration. For example, you’ll specify its purpose, the API groups you plan to use, your authentication type, and so on. After submitting your form, NICE auto-generates a tracking number.
After processing your application, NICE responds back with credentials for you to set up authentication. These credentials are unique to your application and should be used for all authentication calls within the environment they’re issued.
NICE typically takes 2-3 business days to process a registration. If the technical contacts don’t receive a response within this time frame:
If necessary, be sure to include your tracking number with any emails about your registration.
The following table explains technical configuration details that you must provide in your registration form. The form includes other pieces of information not explained here, like a name for your app.
| FIELD | DETAILS |
|---|---|
| Technical Contacts | Personnel in your organization who are the points of contact for your integration. CXone sends notifications about your app to these addresses, including app registration details. NICE may also periodically contact these personnel to ensure that the email addresses are still active. |
| Tenancy |
Indicate whether your integration will authenticate users for a single tenant or multiple tenants. If you’re building an application that will be used by multiple tenants or customers, you must select Multiple Tenants.
Tip
This app registration process provides you with a client_id and client_secret. The secret and ID are unique to your application and should be used for all authentication calls within the environment they’re issued. |
| CXone Environments |
If you selected Multiple Tenants for the tenancy, you must indicate whether your app will be used for a government environment. If you selected Multiple Tenants for the tenancy, you must indicate which environments your application will support. For each environment your app will be registered in, NICE provides a set of credentials. |
| Authentication Method |
Indicate which OAuth2.0 method your integration will use. The main distinction between the options is that with client_secret_jwt, you're providing the information packaged as a JWT instead of JSON body parameters.
Refer to the OAuth2.0 specification to find out which option to choose. You can also refer to the authentication overview for more information. |
| Origins |
If you plan to build User: Public or User: Confidential application types, enter a list of locations where the application runs. By default, CXone API servers block API calls coming from origins, or applications, that are not pre-approved. This causes failures even if the request is valid. CXone uses Cross-Origin Resource Sharing (CORS) for security. Ensure that you provide a comprehensive list of origins to prevent blocked requests.
CORS configuration is not directly associated with authentication information.
The architecture of CXone provides that the API servers look at the entire set of
registered origins to validate the CORS request, independent of the actual authenticated
sender of the request. This means that a token distributed to "application A"
can be used from an origin associated with "application B".
|
| Scope | You must identify which groups of APIs your app will use. This is only relevant if you're using Central CXone. |
| Application Type | NICE categorizes your app in one of three categories: Back-End, User: Public, or User: Confidential. The majority of integrations are back-end apps. The authentication overview provides more explanation on these three categories and the type of authentication you must use. |
You need to create a user account in CXone. Your app interacts with CXone through this API user account. The account should have:
You must also request an administrator to generate an Access Key ID and Access Key Secret from this account’s settings. During the authentication process, your app must provide these credentials to the authentication server. The drop-down below provides instructions on creating an account and generating an access key ID and secret.
 and select Admin
If you are creating a back-end application, you must create an access key for the integration user. Perform the following steps to create the access key. To do so, your CXone account must have Edit enabled in the My Access Key or Access Key permission. Permissions are handled in your CXone account's role . You, or an administrator, can view role or security profile permissions in the Admin application.
To make the POST request for an access token, you must use the endpoint URL appropriate for your system's region. Contact your CXone Account Representative if you're uncertain which region to use. You can use one of the following:
and select Admin > Employees.
Create a CXone user account that resembles the persona that would use your app. For example, if you're building an agent client, create an account that resembles an agent. It must have a login authenticator assigned, which prompts the user to sign in.
and select Admin
If your app needs to authenticate end-users, set up OpenID Connect (OIDC). If not, set up standard OAuth2.0.
The authentication overview provides more details about authentication and authorization in CXone.
    curl --location 'https://cxone.niceincontact.com/.well-known/openid-configuration'

    // Response:
{
    "issuer": "https://cxone.niceincontact.com",
    "authorization_endpoint": "https://cxone.niceincontact.com/auth/authorize",
    "token_endpoint": "https://cxone.niceincontact.com/auth/token",
    "userinfo_endpoint": "https://cxone.niceincontact.com/auth/userinfo",
    "jwks_uri": "https://cxone.niceincontact.com/auth/jwks",
    "token_endpoint_auth_methods_supported": [
    "client_secret_basic",
    "client_secret_post"
    ],
    "token_endpoint_auth_signing_alg_values_supported": [
    "RS256"
    ],
    "end_session_endpoint": "https://cxone.niceincontact.com/auth/authorize/logout",
    "scopes_supported": [
    "openid"
    ],
    "response_types_supported": [
    "code"
    ],
    "subject_types_supported": [
    "public"
    ],
    "id_token_signing_alg_values_supported": [
    "RS256"
    ],
    "request_object_signing_alg_values_supported": [
    "none"
    ],
    "display_values_supported": [
    "page",
    "popup"
    ],
    "claim_types_supported": [
    "normal"
    ],
    "code_challenge_methods_supported": [
    "S256"
    ]
}
The steps for retrieving an access token are different for standard OAuth and OpenID Connect. Follow the steps for your authentication method of choice.
For this flow, you must provide an Access Key ID and Access Key Secret to the authentication server. You can generate these from a CXone user account. See Task 3 for more information.
If you selected client_secret_post as your authentication method in your app's registration:
Learn more about OpenID Connect on the authentication overview.
OpenID Connect flows entail a series of redirects. The user must be redirected to a webpage that lets them enter their user credentials. This can be either a CXone username and password or credentials from a federated identity provider. Then, the user can be redirected back to the authorization endpoint.
| FIELD | VALUE | DETAILS |
|---|---|---|
| scope* | openid | The only supported value for CXone API authentication. |
| response_type* | code | The only supported value for CXone API authentication. |
| client_id* | application specific | The value that NICE CXone provided upon approval of your app registration. |
| redirect_uri* | application specific | This value changes based on your app. It is the URI that you want to redirect users to after they login with CXone user credentials. |
| state | application specific |
This value is for the use of the application. It's passed unmodified to the redirect callback. For example, this might be used to store the URL that the user is directed to after a successful login. |
| display | Either page or popup | Determines if the CXone login page opens in a new browser tab or a separate window that pops up. |
| max_age | Integer |
Indicates how recently the user must have authenticated to continue using the current user session. This is optional for the initial auth flow and not allowed in other cases.
Enter a value in seconds. When you include this parameter, the returned ID token includes an auth_time claim. |
| id_token_hint | A previously received id_token |
An existing id_token that you have already received. It identifies the user who must authenticate. This is optional for the initial auth flow and not allowed in other cases.
If the identified user matches the current valid user session, then no user interaction is required. If the identity does not match or if there is no current state available, then a new session is started that is constrained to authenticate the identified user. This parameter takes priority of login_hint if both are present. |
| login_hint | Username | This can be used to bypass the request for a username. The user may be able to change the username even with this parameter specified |
| code_challenge | Random string per PKCE standard | A PKCE code challenge, described in section 4.3 of the PKCE standard. This is optional for the initial auth flow and not allowed in other cases. |
| code_challenge_method | S256 | A PKCE code challenge method, described in section 4.3 of the PKCE standard.. This is optional for the initial auth flow and not allowed in other cases. |
| tenantId | The assigned tenant identifier |
This parameter is part of the CXone platform, not the OpenID Connect standard.
The identifier for your CXone tenant that is requesting authentication. This lets you include branding customization to the CXone login page, like a unique banner. This is optional for the initial auth flow and not allowed in other cases. |
If you selected client_secret_post as your authentication method in your app's registration:
Log Out Users
If you set up OpenID Connect, be sure to provide a way for users to log out. To do so, you must redirect the user to a specific URL. In the authentication discovery process, the returned JSON includes an end_session_endpoint field. The value of this field is the URL you can use to redirect the user when logging out.
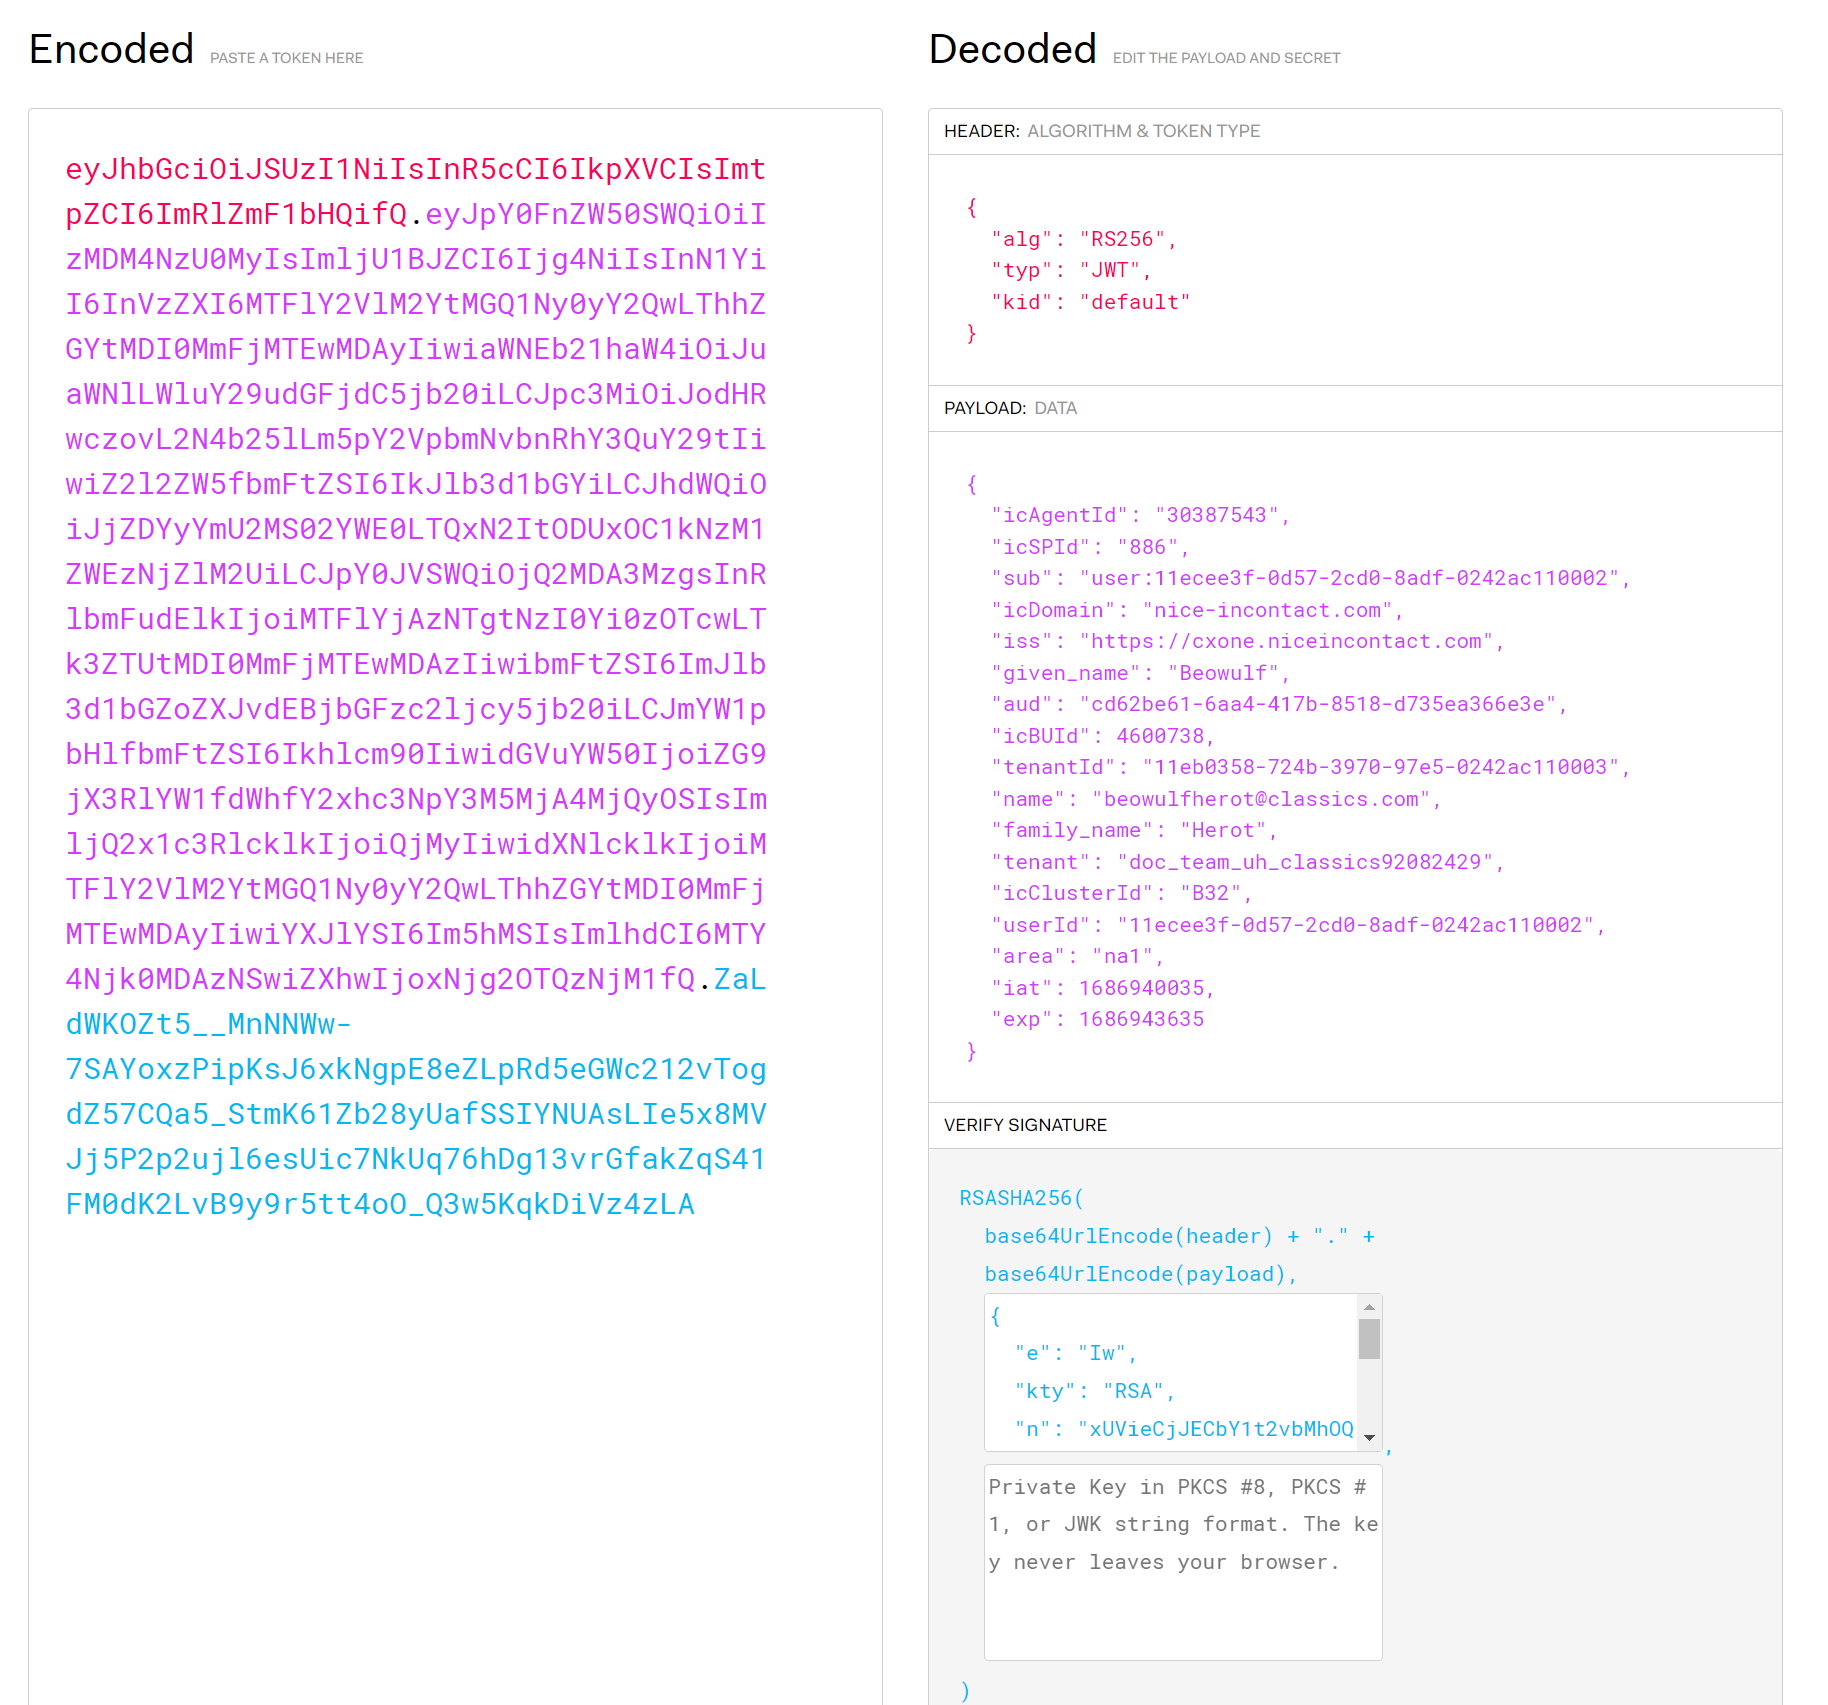
For security reasons, you may want to verify the JWT that was returned during the authentication flow. NiCE signs the JWT with a private RSA key. You can use a correlating public RSA key to verify the token. The /auth/jwks API provides the components to construct the public key, which your app must match with the private key.
You can review the list of authentication resources at the top of this page to learn more about verifying JWTs during the OAuth flow.
Keep in mind the following when verifying the JWT:
Key retrieval logic:
After getting your access token, you can perform API discovery. This helps you determine the appropriate base URL to use for subsequent API calls. You must build a base URL for your API calls, to which you can append your API endpoints. The following is an example base URL: https://api-na1.niceincontact.com. Below is the format, showing the individual components.
Base URL Format:
https://api-{area}.{domain}.com
API discovery entails extracting a tenant ID from the ID token in the /auth/token response, then querying the API discovery endpoint with the tenant ID. This returns the area and domain you should use in the base URL of your API calls.
{
	"access_token": "eyJhbGciOiJSUzI1NiIsInR5cCI6IkpXVCJ9.eyJyb2xlIjp7ImxlZ2FjeUlkIjoiQWRtaW5pc3RyYXRvciIsImlkIjoiMTFlYjAzNTgtNzQwOS0zZDIwLTgyZGYtMDI0MmFjMTEwMDAyIiwibGFzdFVwZGF0ZVRpbWUiOjE2ODY4NDE0NTYwMDAsInNlY29uZGFyeVJvbGVzIjpbXX0sInZpZXdzIjp7fSwiaWNBZ2VudElkIjoiMzAzODc1NDMiLCJpY1NQSWQiOiI4ODYiLCJzdWIiOiJ1c2VyOjExZWNlZTNmLTBkNTctMmNkMC04YWRmLTAyNDJhYzExMDAwMiIsImlzcyI6Imh0dHBzOi8vYXV0aC5uaWNlLWluY29udGFjdC5jb20iLCJnaXZlbl9uYW1lIjoiQmVvd3VsZiIsImF1ZCI6ImNkNjJiZTYxLTZhYTQtNDE3Yi04NTE4LWQ3MzVlYTM2NmUzZUBjeG9uZSIsImljQlVJZCI6NDYwMDczOCwibmFtZSI6ImJlb3d1bGZoZXJvdEBjbGFzc2ljcy5jb20iLCJ0ZW5hbnRJZCI6IjExZWIwMzU4LTcyNGItMzk3MC05N2U1LTAyNDJhYzExMDAwMyIsImZhbWlseV9uYW1lIjoiSGVyb3QiLCJ0ZW5hbnQiOiJkb2NfdGVhbV91aF9jbGFzc2ljczkyMDgyNDI5IiwiaWNDbHVzdGVySWQiOiJCMzIiLCJpYXQiOjE2ODY5NDAwMzUsImV4cCI6MTY4Njk0MzYzNX0.WD5yXN_Nxb_haxgKhqSJzcOuz7l6ezGNIFYGuFUmzlYg4vCnLZAxppGnAwvlfRT7lKtkM85fLK2xUZ-Bec1la_5uvUGObkQFnSTglLYS-q98K4AAyFFqUW1vg9J4smaLEB9hpQu9vjCLkO0BiSFfi4QXo1AHVYJHj0teswwoDhM",
	"token_type": "Bearer",
	"expires_in": 3600,
	"refresh_token": "eyJhbGciOiJSUzI1NiIsInR5cCI6IkpXVCJ9.eyJhdWQiOiJjZDYyYmU2MS02YWE0LTQxN2ItODUxOC1kNzM1ZWEzNjZlM2VAY3hvbmUiLCJpc3MiOiJodHRwczovL2N4b25lLm5pY2VpbmNvbnRhY3QuY29tIiwiaWQiOiIxMWVjZWUzZi0wZDU3LTJjZDAtOGFkZi0wMjQyYWMxMTAwMDIiLCJzZXNzaW9uSWQiOiI0NGNjYmZjMC0wNWY1LTQxMmUtODI4Zi0xZmM0NTBjN2FhMzkiLCJpYXQiOjE2ODY5NDAwMzUsImV4cCI6MTY4Njk0NzIzNX0.c9VmPHJWiBr_sBqKgrzn8dj1CKaqj-VU-LenFl3beAPs-re0Mkbfy6Cv1-VgQF8uzyiQsdua7xsrXcZ4BXXv0ojbdpbkrsp9t-ev1dBqEgatcSBYd06He1BPTvElJbeaLSMR2kpynz2eyvgh2AiKEK1VyztHKMcpZ1P0erqx8P4",
	"id_token": "eyJhbGciOiJSUzI1NiIsInR5cCI6IkpXVCIsImtpZCI6ImRlZmF1bHQifQ.eyJpY0FnZW50SWQiOiIzMDM4NzU0MyIsImljU1BJZCI6Ijg4NiIsInN1YiI6InVzZXI6MTFlY2VlM2YtMGQ1Ny0yY2QwLThhZGYtMDI0MmFjMTEwMDAyIiwiaWNEb21haW4iOiJuaWNlLWluY29udGFjdC5jb20iLCJpc3MiOiJodHRwczovL2N4b25lLm5pY2VpbmNvbnRhY3QuY29tIiwiZ2l2ZW5fbmFtZSI6IkJlb3d1bGYiLCJhdWQiOiJjZDYyYmU2MS02YWE0LTQxN2ItODUxOC1kNzM1ZWEzNjZlM2UiLCJpY0JVSWQiOjQ2MDA3MzgsInRlbmFudElkIjoiMTFlYjAzNTgtNzI0Yi0zOTcwLTk3ZTUtMDI0MmFjMTEwMDAzIiwibmFtZSI6ImJlb3d1bGZoZXJvdEBjbGFzc2ljcy5jb20iLCJmYW1pbHlfbmFtZSI6Ikhlcm90IiwidGVuYW50IjoiZG9jX3RlYW1fdWhfY2xhc3NpY3M5MjA4MjQyOSIsImljQ2x1c3RlcklkIjoiQjMyIiwidXNlcklkIjoiMTFlY2VlM2YtMGQ1Ny0yY2QwLThhZGYtMDI0MmFjMTEwMDAyIiwiYXJlYSI6Im5hMSIsImlhdCI6MTY4Njk0MDAzNSwiZXhwIjoxNjg2OTQzNjM1fQ.ZaLdWKOZt5__MnNNWw-7SAYoxzPipKsJ6xkNgpE8eZLpRd5eGWc212vTogdZ57CQa5_StmK61Zb28yUafSSIYNUAsLIe5x8MVJj5P2p2ujl6esUic7NkUq76hDg13vrGfakZqS41FM0dK2LvB9y9r5tt4oO_Q3w5KqkDiVz4zLA",
	"issued_token_type": "urn:ietf:params:oauth:token-type:access_token"
}
The following steps explain how to manually dissect a token and extract the parameters within. This process should be automated within a production application.
{issuer}/.well-known/cxone-configuration?tenantId={tenantId}
{
    "private": false,
    "area": "na1",
    "cluster": "B32",
    "domain": "niceincontact.com",
    "acdDomain": "nice-incontact.com",
    "uhDomain": "nice-incontact.com",
    "ui_endpoint": "https://na1.nice-incontact.com",
    "auth_endpoint": "https://na1.nice-incontact.com",
    "api_endpoint": "https://api-na1.niceincontact.com",
    "tenantId": "11eb0358-724b-3970-97e5-0242ac110003"
}
After determining your base URL, you can append the individual endpoints for the APIs you want to use. You can copy the endpoints from the API's documentation. You can also sign in and try out the API from the documentation, which returns the fully qualified URL in the response.
After completing the five tasks on this page, you should have:
CXone recommends following Best Practices for quality and seamless integration with CXone applications.
Do Not Open the Authorization Page Within an Iframe
The CXone authorization flow is not supported when embedded inside an iframe due to security restrictions and browser compatibility issues. For optimal security and functionality, please ensure that the authorization page is opened in a top-level window or tab.
Validate id_token After Login
As per industry standards, client applications should validate the id_token immediately after a successful login. This ensures that the token is authentic, hasn't expired, and contains the correct claims. Only after validating the id_token should the application proceed with using the access token and refresh token to make API calls.
Allow for Clock Skew Tolerance
Client applications should allow for a clock skew tolerance of up to 5 minutes to ensure smooth token validation without issues arising from slight system time discrepancies.
Do Not Impose Token Size Restrictions
Token size in OIDC is not fixed and may vary based on claims, format, and signing mechanisms. Validating token size is not a standard practice and can break client applications. Instead, focus on proper token validation, such as signature, expiration, issuer, and audience checks.